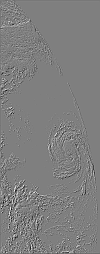
Imparting a three-dimensional look to the clouds in the true-color image can be accomplished by running an embossing filter over the blue band of the image and then adding the resulting shadows and subtracting the resulting highlights from the true color image. (You might have expected me to add the highlights and subtract the shadows. I do the reverse, however, because this is a northern hemisphere image, and the embossing filter produces light and shadow as if the image were illuminated from the upper left i.e. north. Reversing the two operations gives the expected southern illumination.)
Start with the sheared and padded image from the previous page and split it into its three color components.
ppmtorgb3 S1999244172740.L1A_HNSG.sheared.padded.ppm
This will create three images having the following names.
S1999244172740.L1A_HNSG.sheared.padded.red
S1999244172740.L1A_HNSG.sheared.padded.grn
S1999244172740.L1A_HNSG.sheared.padded.blu
Enhance the cloud contrast in the blue component and then emboss the result.
pgmnorm -bv 150 -wv 255 S1999244172740.L1A_HNSG.sheared.padded.blu \
| convert -emboss - blue_embossed.pgm
I use xv and my middle mouse button to find out
the pixel value of the mid-level gray in the embossed image. It is 127
in this case, so I make a gray image of the same size (1848 by 4685)
with that pixel value.
perl -e 'print "P5\n1848 4685\n255\n",(chr(127)x(1848*4685))' > gray.pgm
I make separate highlight and shadow images (positive and negative) by subtracting the gray image from the embossed one and vice versa followed by a contrast reducing step.
pnmarith -s blue_embossed.pgm gray.pgm | ppmdim 0.5 > positive.pgm
pnmarith -s gray.pgm blue_embossed.pgm | ppmdim 0.5 > negative.pgm

Now add the shadows and subtract the highlights.
pnmarith -a S1999244172740.L1A_HNSG.sheared.padded.ppm negative.pgm \
| pnmarith -s - positive.pgm \
> S1999244172740.L1A_HNSG.sheared.padded.clouds_raised.ppm
Finally, apply the sky effect -- just as on the previous page.
pnmarith -m S1999244172740.L1A_HNSG.sheared.padded.clouds_raised.ppm mask.shifted_left.pgm \
> S1999244172740.L1A_HNSG.sheared.padded.clouds_raised.edge_faded.ppm

pnminvert mask.shifted_left.pgm \
| pnmarith -m - sky.ppm \
| pnmarith -a - S1999244172740.L1A_HNSG.sheared.padded.clouds_raised.edge_faded.ppm \
| pnmarith -m - mask.pgm \
> S1999244172740.L1A_HNSG.sheared.padded.clouds_raised.edge_faded.sky_added.ppm
At this point some folks might feel the need (heaven knows why) to rename the final images.
S1999244172740.L1A_HNSG.sheared.padded.edge_faded.sky_added.ppm               (without raised cloud effect)
S1999244172740.L1A_HNSG.sheared.padded.clouds_raised.edge_faded.sky_added.ppm (with    raised cloud effect)
You also may want to clean up in whatever directory you were doing all this image fiddling since I left quite a few temporary files lying about as I went along. To remove all files except the input HDF file and the two final PPM files, you could incant the following under unix.
rm S1999244172740.L1A_HNSG.ppm \
   S1999244172740.L1A_HNSG.left_edge_stretched.ppm \
   S1999244172740.L1A_HNSG.left_edge_stretched.sharpened.ppm \
   measurements.txt \
   S1999244172740.L1A_HNSG.sheared.ppm \
   mask.pgm \
   mask.shifted_left.pgm \
   S1999244172740.L1A_HNSG.sheared.padded.ppm \
   S1999244172740.L1A_HNSG.sheared.padded.edge_faded.ppm \
   sky.ppm \
   S1999244172740.L1A_HNSG.sheared.padded.red \
   S1999244172740.L1A_HNSG.sheared.padded.grn \
   S1999244172740.L1A_HNSG.sheared.padded.blu \
   blue_embossed.pgm \
   gray.pgm \
   positive.pgm \
   negative.pgm \
   S1999244172740.L1A_HNSG.sheared.padded.clouds_raised.ppm \
   S1999244172740.L1A_HNSG.sheared.padded.clouds_raised.edge_faded.ppm
| Previous | Beginning |
Norman Kuring <norman@seawifs.gsfc.nasa.gov>
16 November 2000